
How to Send Custom Push Notifications Using In-App Notifications
1. Overview
In-App Notifications let you send real-time, personalized messages directly to your BrandChamps.
These messages are stored in the BrandChamp’s Notification Inbox, allowing them to view the notification again later. BrandChamps who have installed your PWA and enabled push notifications can also receive the message as a native push alert on mobile or desktop.
Use them to promote new activities, reward drops, community posts, referral campaigns, and more.
Note: The Custom Push Notifications module has been renamed In-App Notifications. You can still send custom push notifications as before, but they are now also saved in each recipient’s Notification Inbox.
2. Who Can Use This
There are two parts to it
- Requirements for sending push notifications:
- Your program must have Enable app installation prompt for users turned on under Settings → Branding.
- BrandChamps must have:
- Installed your PWA
- Enabled push notifications through their browser or device
- Logged in to the app
- In-App Notification
All the BrandChamps can see these notifications sent to them from their Notification Inbox.
📘 Need help setting up PWA? -View the guide on enabling your BrandChamp Mobile App
🔒 Note: This custom in-app notification feature is only available on the Pro Plan or higher.
3. What You Can Do With It
- Send custom notifications with a title and body
- Deliver notifications to the member’s Notification Inbox
- Send push alerts to BrandChamps who have push notifications enabled
- Use dynamic tokens such as
{{FIRST-NAME}}for personalization - Target specific segments using tag filters
- Redirect recipients to specific destinations within your program
- Add an external link and custom button label
- Preview both the Notification Inbox message and push alert before sending
4. Step-by-Step: Sending a Custom Notification
Step 1: Go to the In-App Notification
- Navigate to Communications > In-App Notifications
- Click the Compose button

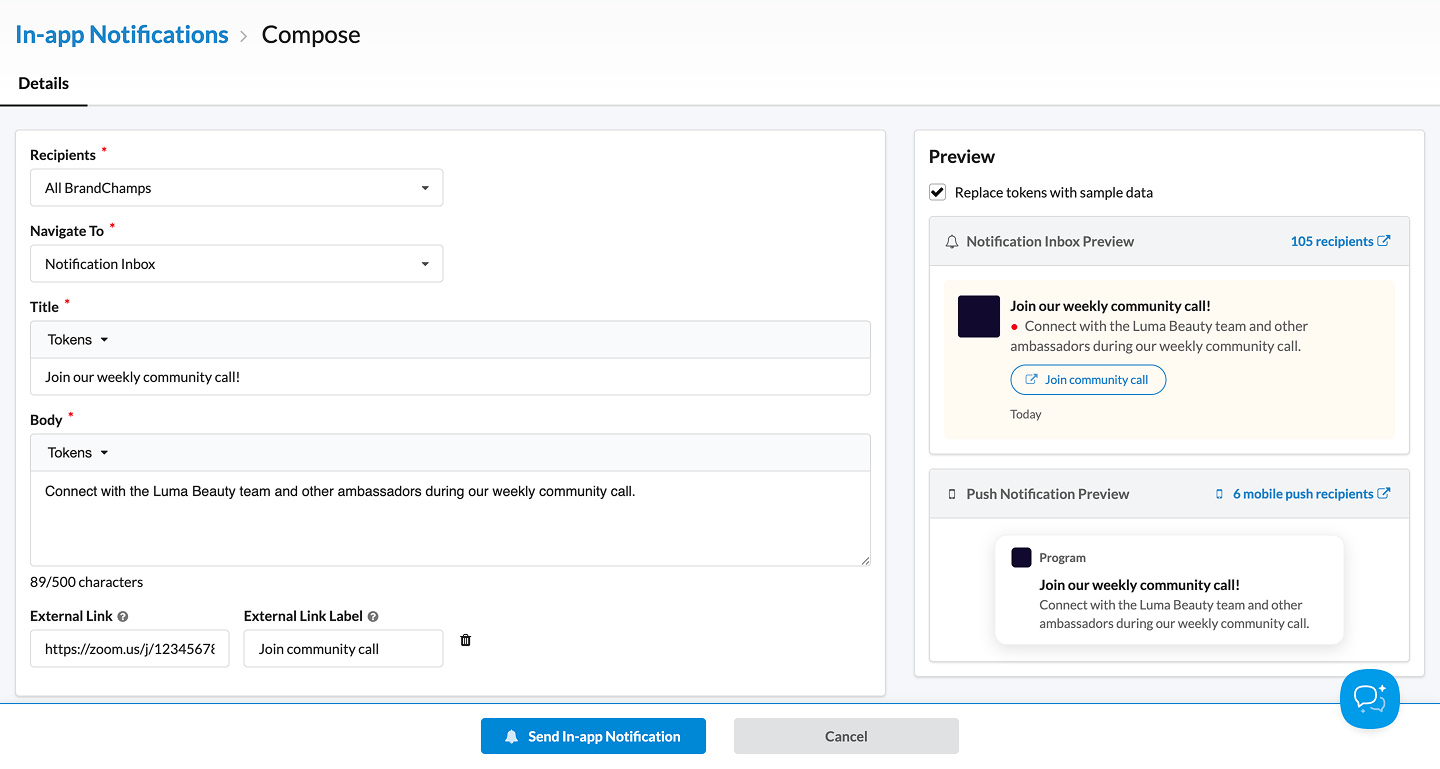
Step 2: Choose Recipients
- Open the Recipients dropdown
- Select one of the available recipient filters:
- All BrandChamps
- BrandChamps with any selected tags
- BrandChamps with all selected tags
- BrandChamps without specific tags
The notification will appear in the recipients’ Notification Inboxes. Eligible BrandChamps who have push notifications enabled can also receive a push alert.
Step 3: Select Navigation Target
-
Use the Navigate To field to choose where the BrandChamp should be directed when they open the notification.
Supported destinations include:
- Home
- Available Activities
- Rewards Catalog
- Pending Rewards
- Issued Rewards
- Community Posts
- Featured Content
- Referrals
- User Profile
- Balance and Transaction History
- Notification Inbox
Step 4: Add Title and Message Body
- Both fields support dynamic tokens like:
- {{FIRST-NAME}}
- {{LAST-NAME}}
- Character limits:
- Title: 50 characters max
- Body: Up to 500 characters (we recommend keeping it under 120 for clarity)
💡 Use short, action-oriented copy for best results.
Step 5: Add an External Link - Optional
When you choose Notification Inbox under Navigate To, you can optionally include:
- External Link: The URL the BrandChamp should be directed to
- External Link Label: The text displayed on the action button
For example:
- External Link:
https://example.com/register - External Link Label:
Register now
The BrandChamp can open the notification in their inbox, read the full message, and select the button to visit the linked page.
Step 6: Preview the Notification
A real-time preview appears as you type.
The preview shows how the message will appear in:
- The Notification Inbox
- A push notification
Select Replace tokens with sample data to see how personalized information will appear to recipients.
Step 7: Send the Notification
- Review your message, targeting, and navigation settings
- Select Send Notification
The message will be stored in the selected recipients’ Notification Inboxes. BrandChamps who have push notifications enabled may also receive it as a push alert.
5. Sent Notification Log
You can view past notifications from the Sent tab.
Each notification includes:
- To = Number of recipients
- Targeting = Tag-based targeting criteria
- Title = Message title
- Sent At = Sent timestamp
- Sent by =Admin user
This is useful for auditing campaigns and troubleshooting delivery scope.

6. Best Practices & Tips
- Use tokens such as
{{FIRST-NAME}}to personalize your message.- Keep titles and messages short and clear.
- Choose a destination related to the notification.
- Use a clear external link label, such as View activity, Register now, or Learn more.
- Use tag filters to send relevant notifications to the right members.
- Use notifications for time-sensitive campaigns, including:
- Limited-time rewards
- Flash challenges
- New activities
- Referral campaigns
- Important program announcements
7. Additional Notes & Troubleshooting
- Notifications can be reviewed later from the member’s Notification Inbox.
- Only BrandChamps who have installed the PWA and enabled push notifications will receive the additional push alert.
- Some devices may delay push delivery after extended inactivity, depending on the operating system or browser.
- Push notifications require the program’s PWA installation prompt to be enabled.